How to Install PAC-BLU to Control an Electric Latch Retraction Exit Device
Need support?
- Live Support: Click the “Chat Now” button in the lower right hand corner of your screen.
- Phone: Call us at (661) 294-3707 Ext. 2 | M-F 8:00 AM – 4:30 PM PST
- Email: Email us at pacblu@paclock.com

Item Breakdown
Included with the PB-Access-Kit:
- PB-Access: Manages access and power to the Electric Latch Retraction (ELR) device.
- Power Supply: Converts AC to 12V DC for PB-Access and other components. Supplies up to 3A.
Items Purchased Separately:
- Electric Latch Retraction (ELR) Device: Controls door locking mechanism.
- 12-24V Boost Converter: Steps up voltage when required (newer ELR devices accept 12-24V directly and won’t need this).
- Door Loop or Power Transfer Hinge: Used to safely route wires between the door and frame.
Installation Steps
Recommended Preparation
Before heading to the job site, we encourage you to do the following to reduce time spent at the job site:
- Power up the PB-Access and add it to the customer’s company.
- This will allow you or the customer to assign access rights to users and allow them to download the app. When you install the access control, users can immediately begin using the system.
- Connect the PB-Access to the Electric Latch Retraction Device (using the 12-24V boost converter if required for your ELR) to ensure it functions as intended.
Mount the Electric Latch Retraction Device
- Follow the manufacturer’s guidelines to install the ELR.
- Ensure the device aligns properly with the door latch for smooth retraction.
- Double-check the alignment by manually retracting the latch to confirm smooth operation.
Install the Door Loop or Power Transfer Hinge (if required)
- Use a door loop or power transfer hinge to route wires safely.
- Ensure the wires are protected from wear and tear over time.
- Secure cables properly to prevent disconnection due to door movement.
Connect the Door Hardware to the 12-24V Boost Converter or the PB-Access
- If your door hardware supports 12-24V input, connect it directly to PB-Access.
- If your door hardware does not support 12-24V input, connect it to the 12-24V Boost Converter.
- Connect the power wires from the door hardware to the 24V output on the boost converter

Plug in the Power Supply into the PB-Access
- Before plugging in, ensure all wiring connections are completed and double-checked.
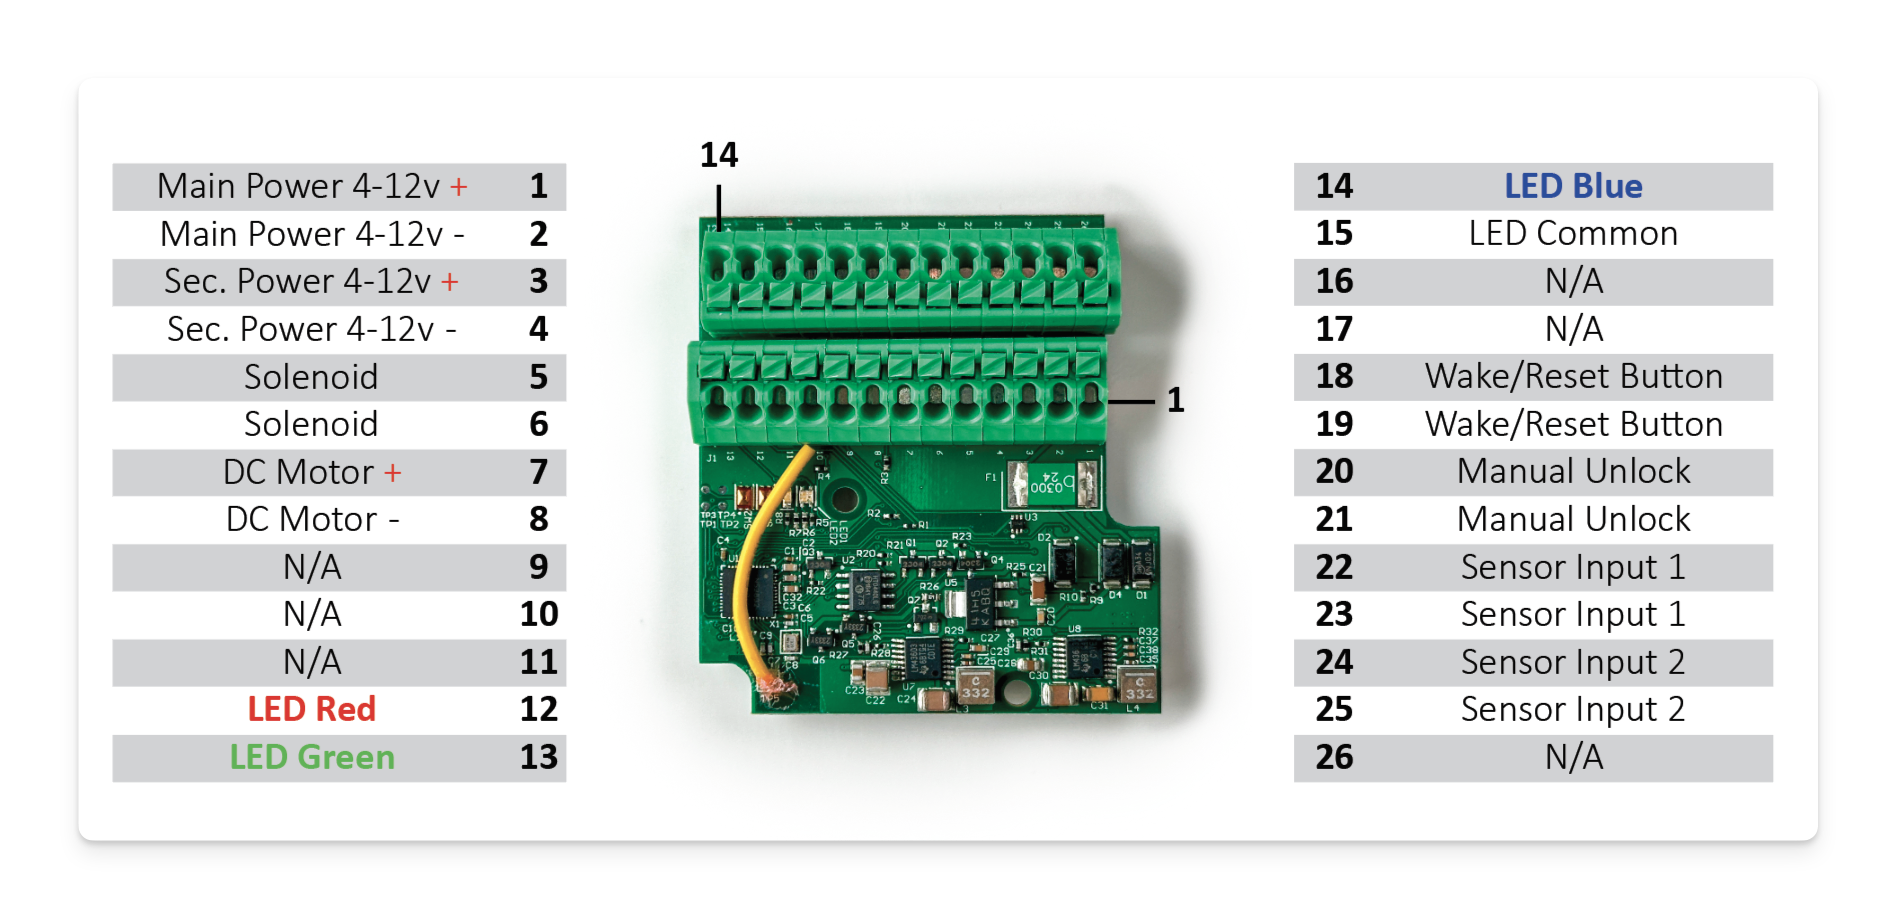
- Locate the 12V power supply and connect the install the wires to their respective pins. Follow the wiring diagram below:
- Main Power (4-12V): Pins 1 (+) and 2 (-)
- Secondary Power (4-12V): Pins 3 (+) and 4 (-)
- Only after verifying the wiring, plug the power supply into the 110VAC outlet.
- Open the PB-Access app and check for connectivity to confirm proper operation.
Power Up the System
- Only after wiring is complete, plug in the 12V power supply to the 110VAC outlet.
- Verify that the PB-Access powers up.
- Ensure no exposed wires or loose connections before finalizing installation.
Powering up and Connecting
To power up and connect to the PB-Access, please view the guide below. Once completed, proceed to the next step.
Test the PB-Access & ELR Retraction
- Trigger an unlock event via the PB-Access app.
- Confirm that the ELR device retracts smoothly and releases the latch.
- Repeat several times to ensure consistent operation.
Troubleshooting Common Issues
- Check wiring connections if the ELR does not retract.
- Use a multimeter to measure voltage at the ELR device.
- Inspect door loop or power transfer hinge for damaged wires.
Conclusion
By following this guide, you can integrate PB-Access with an ELR exit device efficiently and securely. For further assistance, contact our support team.